

Do you want to know how to customize checkout page in woocommerce? One of the most crucial parts of the buying process is the checkout; as such, it is essential that you modify and optimize it to maximize sales. In this tutorial, you’ll learn how to modify the WooCommerce checkout screen in a variety of ways, including using plugins and code.
Changing the WooCommerce checkout page is important because…
- The checkout page is a pivotal point of every WooCommerce shop. Taking payment from a consumer signifies the completion of a transaction. You should maximize conversions at the checkout to reduce cart abandonment and stay competitive.
- WooCommerce has a fantastic default setting out of the box, but if you want to boost your store’s conversion rate, even more, you may need to tweak the checkout page.
- You may use CSS to alter the look of the shopping cart before finalizing your purchase.
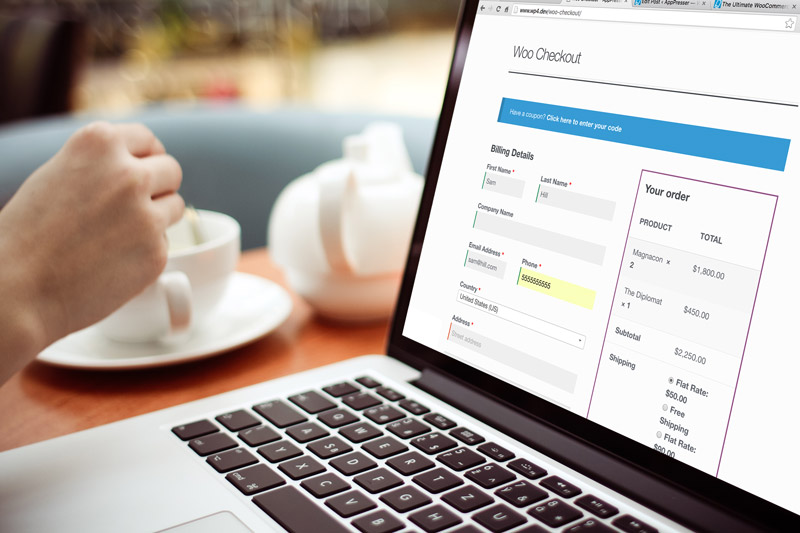
- Modify existing checkout options by adding, removing, or reordering fields
- Edit the required/optional status of a field and add text
- You may make use of conditional fields and logic by adding them.
After learning why to modify the store page and eliminate fields from the checkout, we will now look at the two methods available for modifying the WooCommerce checkout.
WooCommerce Checkout Page Customization Using Two Different Approaches
The WooCommerce checkout page may be modified in two ways, both of which are covered in this tutorial. So, let’s have a look at how to customize the checkout page in woocommerce
Let’s investigate each potential course of action in detail.
- Install a plugin to personalize the purchasing page
The WooCommerce checkout page may be customized using a plugin even if you don’t know how to code. However, WooCommerce Checkout Manager is what we’ll be using for this guide.
There are now around 90,000 users of this plugin, which has been available for a few years. You may download the free, although limited, version from this page, or pay as little as $ 19 a year for one of three premium plans offering much more extensive capabilities (one-time payment). So, let’s have a look at the capabilities of this instrument.
- Manager for WooCommerce Checkouts
There are many different plugins available, but one of the finest is Checkout Manager. It lets you customize the checkout page by adding, removing, or rearranging information to increase conversions. The finest thing is that it may be used with no effort. For the checkout page to display shipping, billing, and other data, for instance, you may toggle on the corresponding settings from the menu.
First name, last name, firm name, nation, city, zip code, address, phone number, email, and many more fields may be shown or hidden with this tool. The Billing, Shipping, or Additional tabs in your WordPress dashboard’s WooCommerce > Checkout menu can help you do this. You may choose which fields to show or conceal from the list that appears.
- Make your own file-uploading field
A great feature of the WooCommerce Checkout Manager plugin is that it allows customers to upload any kind of file when making a purchase, which may be quite useful in certain situations. When renting a vehicle or hotel room online, you’ll often be asked to provide a photocopy of your driver’s license or other form of identification. In the event that more documentation is required, you may make changes to the relevant files and allow users to handle their own file storage. Any required or optional field may also have a set or percentage cost added to it.
- Add charges to the final bill.
Adding new fees is a fun and useful way to customize the WooCommerce checkout page. This is helpful if you want to tack on an extra fee for things like:
- Immediate shipping
- Isolated care
- Some international destinations incur an additional fee for shipping.
- Payment processing or credit card fees
WooCommerce does provide a few methods for including these surcharges, however, Checkout Manager gives you much more leeway and customization. Access WooCommerce > Checkout > Billing in Checkout Manager to set up new charges.
Various optional billing fields will appear. To add an Express Delivery charge as an example, we click the Add New Field option to create a new field in the checkout process. We’ll label the new input field, then pick “radio” as the button type.
- Modify the shopping cart page in code (coding)
Here, we’ll break down the code for customizing WooCommerce’s payment page. This means that you will have the skills to:
- Include optional fields in your WooCommerce order summary
- Register individualized data in the database.
- Create a new, optional mandatory field.
- Boost the shopping cart with more information
- Make use of WooCommerce shortcodes on the purchase confirmation page.
- Use your own CSS to style the shopping cart page
There are a few hooks in the WooCommerce checkout process that will allow you to make these adjustments. The best place to start learning about hooks and how to utilize them in WooCommerce is with our beginner’s tutorial. Since we’ll be making modifications to the functions.php file, a child theme is highly recommended.
End Note
Changing the checkout page and learning how to customize checkout page in woocommerce may have a major impact and help you go to the next level with your WooCommerce shop. Simple adjustments may have a significant impact on conversion rates and ultimately, revenue. WooCommerce Checkout Manager is the way to go if you don’t know how to code but yet need a reliable solution.